Buy Handmade in the UK

Buy Handmade in the UK
My Misi Store

Saturday 29 November 2008

Even More Fast & Fun Notes

Here's the last batch of cards using the Fun & Fast Notes stamp Set from Stampin' Up. I've finally replaced my mini sewing machine (knocked the last one off the table ... they do not bounce well!!) so I got to do a bit of sewing on these. The buttons are from my stash again, I'm still using up a bunch of A Muse notecards (lots left still) but the ribbon is the SU! 1/4" grosgrain from Mad Mumma's starter kit.

I love torn cardstock for a bit of added texture ... especially when it's been machine stitched.
I wanted to do something quite simple & elegant too & the result was these last two cards. I used markers to colour direct on to the stamps, matted the images & added the ribbon detail. These are probably 10 minute cards, so ideal if you need to make a batch in a hurry.
If you'd like to buy SU! products in the UK, contact Mad Mumma through her blog ... I'll guarantee she'll be happy to help!

Friday 28 November 2008

More Fast & Fun Notes

So here are even more cards from that same stamp set (Fast & Fun Notes) combined with the Spot On roller stamp ... nothing different apart from the colours & images, as I have stuck to exactly the same design for them all. Using the same layout makes it soooo simple to create a whole bunch of cards in a hurry!
I'm going to make up a few sets of notecards like these for various relatives as li'l Christmas gifts ... an economical choice for me (can you say credit crunch???) & something that I am sure will be well-received & useful! See that tag in the bottom picture? Yup! same as the Christmas ones but with a different image - super simple!

If you would like to see a current Stampin' Up! catalogue, host a workshop or just buy these stamps, you can do it all at Mad Mumma's blog. Go on ... you know you want to! LOL

Thursday 27 November 2008

All Spruced Up!

Here's the rest of the cards & tags I made on my playdate with Mad Mumma. It is exactly the same image as yesterday's post (felt like I stamped 100 of these! LOL), using a whole bunch of left over A Muse notecards. These were just sooooo quick to put together & assuming I get the copyright stamp in time, I'll be donating them to DS4's school Christmas Fayre on December 5th ... go me! LOL
Another bunch of those manilla tags - great for Xmas gifts & plenty of space on the back to add a personal message.
It's nearly end of the month ... if you aren't already following this blog, sign up now for a chance to win goodies! The link is up near the top right of the page! Oh! & I'm giving a li'l RAK for Mad Mumma's followers too, so why not pop on over there as well.

Wednesday 26 November 2008

Mad Mumma's Workshop


I made this li'l Christmas set with goodies from Mad Mumma's SU! starter kit for a workshop next Friday. Really quick & easy to put together! The tag is a manilla luggage label ... I have a ton of these! LOL. The design isn't really mine I guess as it is very similar to one of the ideas on the leaflet that comes with the kit.
I entered a bit of a stampin' frenzy really & made, over the course of a couple of evenings, a total of 24 cards & 6 gift tags. All from the same stamp set (Fast & Fun Notes) using the Spot On jumbo roller stamp. I tell you, I'm loving the roller stamp ... makes backgrounds & borders fun & super-quick!
If you want to know more about this li'l project, find it at Mad Mumma Stampin'.

Tuesday 25 November 2008

Trees Are For Life, Not Just For Christmas!

This li'l tree won't do much to alleviate the effects of greenhouse gases but it will enhance the environment, aesthetically speaking of course.
I have to say, I am rather pleased with it as it is my first. I used over 6m of ribbon & that really hasn't made a dent in my stash ... maybe when I've done a couple more? I have had rather a busy day today & finished up a whole bunch of projects. But rather than bombard you with a huge post, I'm gonna schedule some for the next couple days ... little & often - that's the key! Hopefully, by the time you've caught up with the latest bunch of projects, I should have some more ready to go ... love this time of year ... so much to make!!
I've listed these ribbon trees in my Misi store ... tell me, what do you think?

NaBloPoMo

Just came across this fun site ... the deal is to post every day for a month - & that's it. Well, obviously I won't do that this month but I thought I'd sign up ready for December. Yup! I'm gonna have a go at posting everyday in December ... including Christmas (well, I might cheat a li'l bit & schedule a couple posts for the celebratory days).
Be back later ... I've been making stuff!!

Monday 24 November 2008

Woo-Hoo!!

Just got in from grocery shopping (I loathe grocery shopping!!) to a cryptic e-mail from Jo congratulating me on making the Creatively Yours team! I assumed it was a mistake as I'd not had an e-mail ... so I checked & yup! it's all true!!!
Soooooo excited, can't wait to get started ... check out the announcement here!!

Edited to add: found the e-mail in my spam folder ... darn filter allows obvious spam (you need to give us the details to your e-bay/paypal/bank accounts so we can empty your account sorta e-mails) & filters a whole bunch every day that I have to restore. Go figure! LOL

Sunday 23 November 2008

I came across this challenge blog just a couple days ago, via Vanessa's blog I think, & they had a DT call on. Noella has some fabulous sketches & I thought I might quite like to be on the DT there ... so I applied at the 11th hour.

This is the layout I created for the call, using Noella's 6x12 sketch #3. Sooooo difficult to choose just 1 sketch to use! LOL. This is a total mix of old stash well past the time to use it up & the newest ... Basic Grey, Wassail papers that Auntie Jane brought for me on her visit last week ... she always brings the best goodies with her from the US!
I have a whole bunch of DT applications to make thru December ... sure, I probably won't get them all ... maybe I won't get any but it certainly keeps me on my toes & ensures that I keep creating!!
6x12 Santa Layout Supplies: Textured cardstock: DCWV, Patterned papers: Basic Grey, Wassail; Journal Spot: Handmade; Pearls: Kaisercraft; Pinwheels, white brads: HOTP; Holly Leaves: Prima Marketing; Crackle Paint: Ranger; Snowflake eyelets, chipboard star & brackets, cream fibre: unknown from stash; tiny pinecones: from a local park

Saturday 22 November 2008

SU! ... We Do!

No piccies this time ... I have been working hard on that new SU! blog that I mentioned here. & it went live just a li'l while ago, so I can tell you now that it belongs to ............ My Mum!!! I hope you'll all pop on over & take a lookie ... we've worked hard getting all the links set up, all the important info blogged & a li'l RAK set up ... just to get it all off to a fabulous start!
Go visit Mad Mumma Stampin' now!!

Thursday 20 November 2008

Di's November #3 Sketch

I do love being part of Di's sketch team ... it gives me just the excuse I need to make at least one card every week, even when I'm not feeling creative. And that's usually enough to get my mojo going so I can create more cards all week long. I gave all my christmas cards away ... so I'm starting over for my own stash! LOL. It might seem like a daft thing to do but I quite like making them, so I'm happy to start over.

I thought I'd used all the Fancy Pants Holly Jolly scraps that I had but I found another bunch hidden away in a pizza box (I store my project supplies in them until I'm done ... most of the time they don't get unpacked again for months!) which is OK cuz I love this line ... although you might be sick of them now!!
Lots more machine stitching & a few odd embellies. The snowflake punch is a Stampin' Up! one, now retired I think & I made the crystal swirls using a Crafter's Workshop template that Auntie Jane bought for me last time she visited from the US.

If you haven't already, don't forget to 'follow this blog' (there's a link up at the top right), there'll be a RAK at the end of the month for all my followers!

Monday 17 November 2008

Sew Far Sew Good

I have been a busy li'l bee this weekend working on a custom order for an etsy customer & cutting loadsa li'l felty things for my new Misi store, here in the UK. You might remember the li'l pink camera case that I made myself back in August ... & now I have been asked to make them in lilac & blue too ... OMG! I think I might need a lilac one now! LOL

So I made a few extra to list on the Misi store ... have you joined the forums there yet? There's a fab li'l community building!
I also made a bunch of these cute li'l ribbon flowers ... soooo pretty I think. I had quite a lot of this ribbon left from a previous project (some time ago now) & I didn't think I was going to use it again, then I spied these cloisonne beads in my pink bead jar (oh yes! I have an entire jar just for pink beads!!) & the flowers just came together after that! The 'petals' are wired on the outer edge, so you can manipulate them to the perfect puffiness!
There should be a whole bunch of li'l Christmas softies tomorrow ... if I get them finished ... Can you say tree decorations????

Sunday 16 November 2008

Deanne's November 15th Sketch

Loved working with Deanne's new sketch ... although it did take a li'l while to get everything to come together. I really wanted to shabby everything up for this one, so I had a bit of a play with some different techniques.

I used papers from Fancy Pants Crush line & the ledger paper is Holly Jolly. I sanded the edges of all the papers & for the journaling mat I used a distressing tool (remember the Making Memories distressing kit???) to shabby up the right hand edge - I created the torn notebook effect on the left edge by making holes with a cropadile & then tearing out from the holes to the edge ... then I inked it all up!
The photos were cut leaving a white border, roughed up with the distressing tool & then inked. I machine stitched the ribbons in place ... check out the printed leaves twill - it's Cosmo Cricket ... from the Mr Campy line.
I inked the chipboard flourish with olive pastel chalk ink (love chalk inks) & then aged the edge with chestnut roan chalk ink. The 'stems' were painted with crackle paint & then aged with chestnut roan too. I added a twist of rusty wire (scrapbook safe stuff that I've had lying around for 3 years!!) & the blossoms are made up from Prima Artful Collage, Kaisercraft (taupe)& self adhesive pearls (I used Blush)
I broke out the acrylic paint & my old foam stamps for the title ... haven't used them for ages either! If you got the september embellie kit, you'll have one of these fabric tabs (to the left of the bottom left photo) too - i just swiped with a bit of ink to make it look less 'new'

Saturday 15 November 2008

Do You SU! ???

Someone close to me (emotionally & geographically) is about to join the Stampin' Up family ... not saying who until it's all official - & no, it's not me ... I'm not allowed cuz I own a craft business (*insert sad face smilie here*). Although, I have to say with the hassles the webstore is causing me, I'm sorely tempted to jack it all in & sign up with SU! myself! LOL.
Anyway, I have been busy helping this lady to build her very first blog & she has asked me to contribute to it when it goes live - of course, I said yes!! The very first SU! personal blog with a 'design team' LOL. It also means I get to play with her kit ... & have the odd workshop/party of course.
I have long been a fan of SU! & I place the blame for that squarely at the feet of my US & Canadian friends who have been showing off SU! goodies on their blogs for as long as I have been blurfing. So I dug out the few SU! bits that I have ... most are retired & I'm not sure they were ever available in the UK & had a bit of a play. I just wanted to brush up on the basics ... I've not stamped much for a li'l while. all stamped images are copyright Stampin' Up.

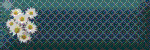
Supplies: Card blanks, sentiment stamp: A Muse; Printed Twill: Cosmo Cricket; Buttons: Dovecraft; Markers, twine, cardstock, stamp set: SU!; Colorbox chalk ink (Chestnut Roan)
Supplies: Card Blanks, Sentiment Stamp: A Muse; Ribbons from stash; Colorbox chalk ink (Chestnut Roan); Markers, stamp set: SU!
Supplies: Sentiment Stamp: A Muse; Ribbons from stash; Violet Love Notes, Cardstock, Markers, Stamp Set: SU!

Luuuurve the Love Notes ... they are soooo dinky at about 3" square. They are only available in white/cream now but I think I'm gonna need a ton of them!
Keep a lookout on the blog ... as soon as it's all official I shall give you the link to the SU! lady's blog ... I think she's gonna kick off with a li'l RAK! Gotta love a freebie.
If you haven't joined my followers (top right of the blog), please do to be in with a chance of winning a RAK at the end of the month ... & to have the latest updates delivered right to your dashboard!!

Friday 14 November 2008

Well It's Not All Bad!

I'm having trouble with the webstore (yes, again!!) & as it has only been back open for a week, it's close to the time when I have to think whether it is time to pack it in. It isn't completely broken ... but after things are added to the shopping cart, the process won't complete. I can't fix it ... don't know how.
I have a note on the homepage to let people know that they can still shop, but they need to e-mail the shopping cart to me so that I can paypal invoice them & manually remove the items from inventory - such a long & tedious task. But no-one seems to be doing that & let's face it, if it's too much hassle wouldn't you shop somewhere that isn't? I know I would!
Anyway, I had a lovely e-mail from a lady called Emma a couple days ago. She's a WAHM who has just started a new business venture called MISI. MISI (Make It - Sell It) is sorta like Etsy but in GBP (£) & UK based, so much better for us Brits. So yup! you guessed it ... I have a MISI store now too.
But Misi is soooo much more than a marketplace (although you'll want to check that out ... some gorgeous stuff there!) it is an entire crafting community ... & completely free to join! There are forums, blogs & shopping - all in the one place. You can search by category, showing you all the goodies from a variety of stores (like having a personal shopper! LOL), 'meet' the sellers in the forums & blurf to your heart's content. You can create a friends list, contact sellers direct & see who is online in real time!
And if you are a seller, there are free stores with custom domain names, free listings until January 2009, free store design (banners, backgrounds & avatars), paypal enabled & all you pay is a modest commission on the items you sell ... so absolutely no risk!!!
So come check us out at MISI ... & while you are there, why don't you register (for free). See you on the boards!

Don't forget to join my followers (link at the top of the blog) ... there's goodies up for grabs at the end of the month!!

Thursday 13 November 2008

Di's November #2 Sketch

As much as I love Di's sketches, I found this one a bit of a struggle & I'm not entirely sure I like the end result. I just isn't how I saw it in my head IYGWIM. It was definitely a great one to use up a bunch of scraps & odd embellies tho!

There's a li'l bit of Teen Chic paper there & the rest is basically odd bits that I had lying around on my desk. I think I'm gonna have to clear it up soon ... the scraps just seem to keep going on forever!
Check out Di's sketch - & if you do something with it, do drop me a comment - I'd love to see it!

Tuesday 11 November 2008

Easily Distracted! LOL

I was supposed to be working on a bunch of these journaling spots, which I also have for sale on Etsy. That meant my desk had allsorts of interesting stuff on it ... Journaling stamps, inkpads, smooth white cardstock. How could any normal (!) person not be distracted?

So I took a break to play & this is what I came up with. Maybe I'm getting old but I'm definitely finding myself drawn more and more to vintage, shabby chic, ephemera, collage ... & anything as old as I am! I'm gonna put some of these online when I've made a bunch more. I'm thinking £1.25 (around $2 USD) for 12 - what do you think? Is that reasonable?
I shall probably pretty mine up a li'l bit ... maybe a strategically placed flower or two, some pearls nestled into the loops at the ends of the scrolls but the ones online will be just like these, all ready for use or altering.
So do you want some for free? Don't forget to sign up as one of my followers on this blog & there will be some up for grabs at the end of the month (with a few other goodies too I'd expect!)

Monday 10 November 2008

More Chocolate!

Another bunch of thank you cards to send out with orders from the webstore & etsy store. I have totally used up my stocks again ... in fact these are also already on their way! LOL. Technically, most of these are not, in fact, entirely made from scrap - there is a paper or two in the collection that I probably wouldn't use on a layout & they have been reserved just for cards.
The card blanks are made from scraps: the offcuts from the calendar pages in this book & some of the other papers are left over from Nina's guest book. I'm using up the die cuts too ... I'll never get through them all otherwise! LOL.

I've taken a few close ups: In this first one , you can see the card panel is distressed, a length of ribbon put in place & then both pieces sewn into position. A stamped sentiment & inked die cuts were added, the smaller one raised on foam pads. The backgrounds were all made in the same way: distressed panels, a length of ribbon & machine stitching ... all done conveyor belt style. This next example covers a mistake or two *smiles*. The patterned card was too dark to show the stamped sentiment, which is hidden under the tag, so all the cards with this pattern have sentiment tags. These are easy to make in bulk too ... simply cut strips of card, stamp the sentiment, cut into tags, round the left side corners & distress the right edge before inking. I used 12" long strips & was able to create 4 tags at a time from them. The tag was stitched on, a die cut added along with a Kaiser flower (love these!) & Kaiser pearls (love these too!!)
For this example, I've just stitched the tag & added a flower & pearl ... v. simple but kinda elegant, I thought.
The patterned card on these ones (scraps) is embossed, so doesn't need much embellishment. I used a butterfly die cut & just curled the wings upward before attaching on foam pads. The body was embellished with Kaiser pearls
I only made 12 this time, so I guess there will be another batch-made-thank-you post coming before too long. I'm thinking maybe black & red ... I have just the right papers in mind!

Sunday 9 November 2008

MMMMMmmmmmm Chocolate!

SEI Jolie Chocolat, that is. I bought this paper pack when it first came out I think - with absolutely no idea what I would do with it. But it is gorgeous & girly & sparkly & I neeeeeded it! & it has butterflies! LOL. A li'l while ago, Nina asked me if I'd make her wedding guest book (I have a BIA & she doesn't) & I just knew these papers would be perfect. So last night she (finally) came to pick it up ... & now she has seen it, I'm ready to share with you. It didn't exactly go to plan (a common story!) ... I decided on the pages first (pink record cards) & then I didn't have any covers the right size - what with record cards not being a standard mini-book size. So I cut a bracket shape & made the front cover smaller than the back ... good save huh? You can just see that I've inked the edges of every page (front & back) ... nearly lost the will to live - it gets a bit tedious after the first 10 or so. The front page is a mix of SEI stickers, paper (inked, of course) & Upsy Daisy rub ons, with a couple odd buttons from my stash. I did think about embellishing each page with a butterfly or two & then decided against it ... I didn't want to put anyone off writing in it!!

Maybe I'll make a wedding card with the same papers ... what do you think?

Friday 7 November 2008

Laura's Sketch #12

Another great sketch at 2S4U this week. I'd actually already decided to use these papers for my next card, left over from Nina's wedding album (post about that coming soon!), before I saw the sketch. Spookily, that means that, like Laura, I have a butterfly theme going on. It does mean that my card is an awful lot like hers, bar the colour ... but I love it, so I guess it's OK.

As well as the Jolie Chocolat papers & die cuts, I've used kaisercraft pearls & flowers, A heidi swapp felt butterfly & american crafts ribbon ... rather pleased with that bow: 'twas a pig to get right but I love the puffiness of it. Note to self: plain ribbons are easier to tie ... you don't have to manipulate them to get the pattern face up! LOL
I've included a close up of the flower detail ... mostly for the li'l butterfly. It's really easy to make but looks kinda cool. I punched two butterflies from patterned paper (The punch is by SU! ... retired now I think), stapled them together & gently curled up the top wings before sticking into position.

CCAYR November Challenge ... part deux!

I needed to do one more card for the Christmas Cards All Year Round November challenge but as I'd almost used these scraps up, I thought I might just make one more! LOL. So that's 6 cards this month!

Both are patchwork cards again & if I just had a proper sized sewing machine I'd have sewn the papers. I have one of those li'l hobby machines & you have to bend the card up to get it on to the bed ... anyway, faux stitching! The gingham ribbons are machine stitched & the end held in place by the snowflake embellie.
For my last card I have layered the ribbons on top of each other (great way to hide DST under organza ribbons). See how those paper scraps are really quite small this time? I ran an ink pad over the top of the ribbed cardstock to create the blue stripes & attached 2 snowflake sequins (more of that stash that I never use!!) with mini brads. I added a couple of the teeniest shaped buttons over the snowflake artwork on the tag & raised the word strips with foam pads ... & that's about it!
If you wanted to see the other cards I made for this challenge, go here.
As we are still early in the month, I might manage a few more cards for Christmas ... & there's still tags, gifts & decorations to do ... happy days!

Thursday 6 November 2008

Di's November #1 Sketch

Here's my DT card for Di Hickman's latest sketch. This was a really easy one for using up scraps! I've used Bo Bunny Teen Chic papers but I guess you are going to be seeing them a few more times yet ... these scraps seem to be going on forever!! Be sure to check out the other DT card & snag yourself Di's free digi files ~ they are only free for a li'l while!

Wednesday 5 November 2008

It's Lonely on the Blog!

I've just added the 'followers' gadget to the blog & now I'm waiting for some stalkers ... errrrrm followers I mean! LOL.
One of the best thing about this blogging lark, is 'meeting' new people & all the relationships that we form - just by sharing our thoughts, snippets of our lives & lots of our own crafty moments. I've been using google reader for a while ... following is even better. I don't have to remember to check my reader, all the updates are right there on my blogger dashboard.
& if you follow me, I'll come visit & maybe add you to my reader ... or follow your blog if you are set up for that. Cool huh? I'm pretty sure you can also follow even if you don't have a blog of your own!
AND to celebrate my latest technological breakthrough (OK, I just clicked the button! LOL) ... I'm gonna do a random draw at the end of the month for everyone who is following me - not sure how many winners there will be, I'm gonna wait see how many followers I have first.
Check out the DT's blog too - we are having a random drawing there too!

Tuesday 4 November 2008

CCAYR November Challenge

The November challenge at Christmas Cards All Year Round is a simple recipe:
Use 2 buttons, 2 ribbons & 2 snowflakes to make a card - or 5 cards if you want to enter the monthly draw. So far, I have four done, so it's looking good for getting the 5 done again this month. (Go me!!)

I had a search thru my Christmas stash - these papers & artwork are all from HOTP cardmaker's kits (1-2 years old), the ribbons were already on my desk (I have a jar full of gingham ones, which I have been using a lot recently) & I dug out a bunch of odd embellies packed away last year (mostly magazine freebies). The first card has snowflake artwork & a snowflake border & ribbon attached with double sided tape - nice 'n easy!
Next up: this patchwork card is entirely made from the small scraps that I won't throw away but really build up quickly!! I just covered the card with squares/rectangles & trimmed the overhang & then added faux stitching to create a 'patchwork'. The rub ons didn't show up too well on the blue area of the background, so I added some li'l dots with a white pen (I'm still using a white sharpie, now discontinued), just to the word 'snow' to higlight it - I love happy accidents! LOL. The lace was part of a pack sitting on my desk too - I'd used all the white but the lilac was still there & just right I thought. I added a few gems to the gingham ribbon - just cuz I can.
This card uses a few of the embellies that I normally never use: the embossed silver cardstock frame & puffy fabric snowflake but I have to say I quite like it. The blue snowflake in the middle is a brad & although it looks like just one ribbon, the faux bow is actually a darker, wider gingham ribbon. Sentiment by A Muse.
This last card also uses a bunch of stash that has been lying around for a couple years - again, the die cut, embossed silver panel & white mini-corrugated card are all things I usually wouldn't use but came as freebies & have been squirreled away ever since. I've used another snowflake brad here too, A Muse sentiment & ric rac from the same pack as the lace (Rusty Pickle, Guinevere).

So that's my 4 cards ... & I'll be back with the fifth before the end of the month!

17 Ways to Say 'Thank You'


Deanne posted a fabulous sketch or two a couple days ago & I thought this one was just right to make a whole bunch of Thank You cards. Normally I create one-off cards but as I include a li'l thank you with every order at the webstore, I get through a lot! LOL.
The benefit of batch-making cards is you can create them assembly line style ... completing one step at a time on several cards. I make 5-10 at a time, using whatever scraps I have on hand. Why not have a go yourself & get ahead on all those thank you cards you'll need for the gifts received & party hosts over the Christmas holidays.
If you'd like to see the supply lists, tutorial etc - check it out on the store blog!!

Monday 3 November 2008

2S4U DT Entry

Here, as promised a couple week's back is the scheduled post in which I share the cards I made for the 2 Sketches 4 You DT Call. Obviously, at the time of writing, I had no idea whether these were winning cards or not ... either way, I really like them so I don't actually lose IYGWIM.

This first one is based on Laura's sketch & immediately made me think pleated paper: I sanded along the edges of every pleat to expose the white core & then gently sanded the top to pick up all the ridges where the pleats layer beneath the surface. The pleated panel is machine stitched to the card, close to the edge of each pleat. Plenty of sanding on the other papers too - love shabby style! Here you'll see a lot of the papers & elements I've been playing with recently - cuz, as you know, I like to use the scraps from my desk for card making. The bird is a Heidi Swapp XL Ghost & I've just highlighted it by dry-brushing beige acrylic on the back. The rhinestones are from Kaiser ... this was my first play with them ~ oh my! I love them!!
The second card is based on Kazan's sketch. I saw the line at the bottom, presumably for a sentiment & thought of creating a slit to tuck the top flap into. Lots of black ink on this one, which I don't use so often, cuz I wanted to pick up the polka dot paper as a feature. A different pile of scraps for this one (still from my desk! LOL), this time Bo Bunny Teen Chic & a Fancy Pants Die Cut, from the Jolly Holly range. The Kaiser rhinestones also adhere really well to velvet ric rac! This last pic shows the card open & yes, it will stand on the point!
So that was my DT entry & by the time you read this, I'll know whether I made the team ... exciting times huh?
A li'l update: So I didn't make the team ... but I love doing the sketches & there's always next time, right?

Sunday 2 November 2008

Deanne's November 1st Sketch

Here's my DT page for Deanne's current sketch - I'm just loving being a part of this team. The other designers produce such awesome work for each & every sketch - go check them out. I've used We R Memory Keepers Promenade papers, Prima Artful Collage flowers & a bunch of odd bits from my stash!

Saturday 1 November 2008

Kazan's Sketch #12

A bit late with my cards for this week's challenges at 2 Sketches 4 You ... but then I didn't get back home until Thursday, so I guess I did OK! LOL. I'm in the mood for Christmas planning right now - which means looooads more Christmas cards, tags n gifty things. I've been using up my stash too & with any luck I'll get to start fresh next year cuz I'll have used up all my Chrimbo stash ... wish me luck - that's no small task! LOL.

Anyway, the first card is based on Kazan's sketch #12. All the papers/alphas/tags are from the same freebie paper pack I used in yesterday's post ... flowers n buttons from Making Memories (nearly finished this pack too) & some ribbon from my stash ... loving gingham right now!

The second card is from Joke's bonus sketch. I think this is only the second round card I have ever made ... just used a small cereal bowl to make the card base - same paper supplies again, with the addition of the larger die cut tree & holly leaves (from a random pack of freebie die cuts I have), flowers from a Making Memories freebie prize (more about that another day), some odd buttons, A Muse gems & some black Kaiser rhinestones (I love these sooooo much!)

That's me done for today - boring computer stuff to do, so I don't suppose I'll get to craft again until tonight!

Still Loving Cosmo Cricket!